Taurus FamilyTree Tutorial
This tutorial provides a simple walk-through of most of the features of
Taurus FamilyTree, using the example data file example.xml.
Starting FamilyTree and Loading the Data
On Windows simply double click @run.bat. This will automatically
load example.xml
On Unix (including Linux) type the following:
java com.tsac.familytree.gui.MainFrame example.xml
The Main Window
You should now be looking at a window containing three panes, the tree-view,
the table-view and the document view.
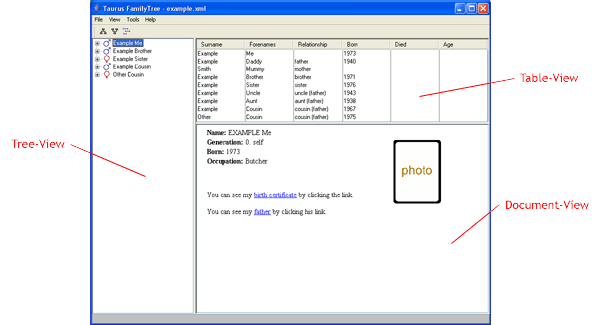
Figure 1: The main window
The tree-view is used to display hierarchies of people, and a person may be
selected for closer examinatiom by clicking on the tree. The gender of a
person is shown using the conventional male and female symbols. The letter
codes are F for father, M for mother, HW
for husband/wife and S for sibling.
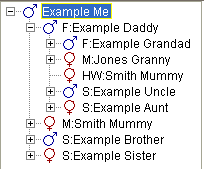
Figure 2: The Tree-View
The table-view shows information about the selected person, their date of
birth, their age etc. It also shows their parents, spouses, siblings, uncles,
aunts, and cousins.
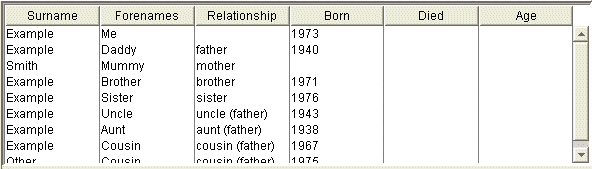
Figure 3: The Table-View
The document-view is used to display descriptive text and pictures for an
individual. Documents can also contain hyperlinks (shown as blue underlined
text).
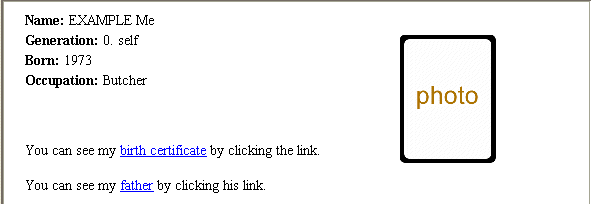
Figure 4: The Document-View
Navigating the Main Window
Navigating between people is easy. You can select a person in three ways:
- Click on a node in the tree-view
- Click a row in the table-view
- Click on a hyperlink in the document-view
Initally, "Example Me" should be selected and displayed in both the
table- and document-views.
Now click on "Example Daddy" in the tree-view. The table-view will
be updated to reflect "Example Daddy"s relations and the document-view
will display the document for "Example Daddy". Note that you can
explore the tree further by clicking on the "+" symbols to expand
parts of the tree.
Now we will use the table-view to navigate to "Example Grandad".
Simply click on "Example Grandad" (the second row down) and the
document-view will show the document for "Example Grandad".
Finally, we can use hyperlinks to navigate between documents. Simply click
on the blue "Great-Grandad Example" link in "Example Grandad"s
document. You should see "Example Great-Grandad"s document in the
document-view.
We can also navigate backwards between hyperlinks in the document-view by
right-clicking and selecting Back from the menu.
Navigating Birth and Marriage Certificates
Each person can have additional information about their birth, christening,
marriage and death associated with them, not just the single document we
have seen so far.
There are two ways in which we can navigate to additional information:
- Click on a hyperlink to the information
- Right-click on the person's node in tree-view and select
Birth, Christening, Marriage or
Death.
Select "Example Me" using the tree-view. You should see that the
document contains a blue underlined hyperlink to "birth certificate".
If you click on this you should, after a short delay, see a scanned image of
"Example Me"s birth certificate.
Now we will use the pull-right menu to display "Example Daddy"s
marriage certificate. Simply right-click on "Example Daddy" in the
tree-view and select Marriage from the resulting menu. Note
that the Birth, Christening and Death
entries are only shown if that information is available.
Description is always available and takes you to the document for
that person - just like clicking on the node itself.
Plotting a Tree
One of the most important features of FamilyTree is the ability to plot
conventional family tree diagrams. With FamilyTree this is incredibly simple,
just select Draw Tree from the Tools menu in the main
window. You should now see another window containing the tree diagram for the
"Example" family:
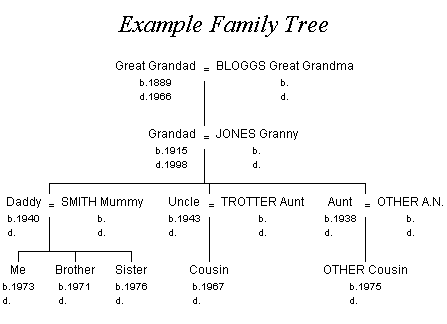
Figure 5: Example Family Tree Diagram
Plotting an Ancestor Diagram
Conventional family trees are plotted downwards with the children of a
particular person, and then their children's children and so on. This is
known as a Descendants Diagram. An Ancestor Diagram is just the opposite. For
a particular person we plot their parents, their parent's parents and so
on. Again this is a simple as selecting Draw Ancestors from the
Tools menu. You should now see another window containing the
ancestor diagram for "Example Me":
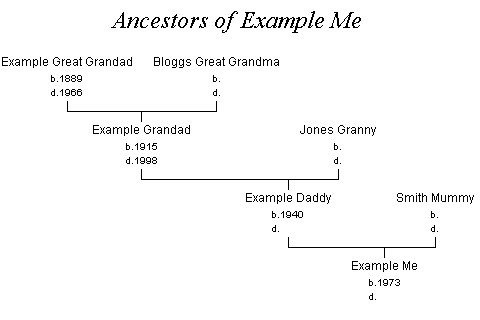
Figure 6: Example Ancestor Diagram
Plotting a Timeline
A unique feature of FamilyTree is the ability to plot a timeline of the lives
of the people in your family. From this you can see whom you are likely to
find in Census Documents and War Records. Plotting a timeline is as easy as
plotting a tree, just select Draw Timeline from the
Tools menu. You should now see a window containing the timeline
diagram for the "Example" family:
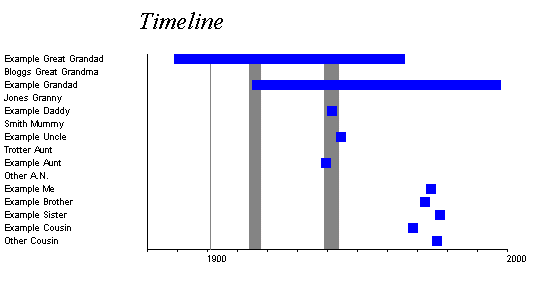
Figure 7: Example Timeline Diagram
Changing the Root and Orientation of the Tree-View
The root of the tree-view is not fixed - you can change it to any one of the
bottom-most children of the tree. This allows you to explore the tree from the
perspective of different families. For example we might want to explore the
"Other" branch of the "Example" family. To do this, bring up the
View menu, go to Set Root, and select
"OTHER Cousin". The tree-view will be updated to show
"Other Cousin" as the root of the tree. If you explore the tree, you
should be able to see that "Example Aunt" is a sibling of
"Example Daddy".
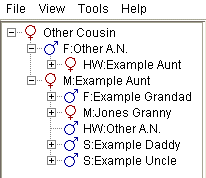
Figure 8: Tree-View with "Other Cousin" as root
The orientation of the tree-view can also be changed - this is a bit like
switching between ancestors (child-first or "inverted") and descendants
(parent-first or "normal") diagrams. To do change the orientation, bring up
the View menu, go to Orientation and select
Normal. You should now see that "Example Great-Grandad"
becomes the root of the tree and that the nodes the children of
"Example Great-Grandad".
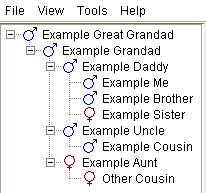
Figure 9: "Normal" Orientation
Changing the Root of Tree Diagrams
Whilst the tree in "Normal" mode, we can change to root of the Tree Diagram
using View->Set Root. Set the root to "OTHER A.N." using
View->Set Root, then draw a tree using
Tools->Draw Tree. You should end up with a very simple tree
diagram:
Figure 10: Tree Diagram using "Set Root"
Changing the Root of Ancestor Diagrams
With the tree-view in "Inverted" mode, View->Set Root also
controls the root of the Ancestor Diagram. First ensure that
View->Orientation is set to Inverted and the use
View->Set Root to select "OTHER Cousin". Now plot an
Ancestor Diagram with Tree->Draw Ancestors. You should see a
diagram, which looks like this:
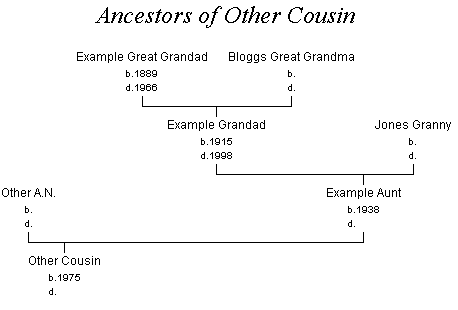
Figure 11: Ancestor Diagram using "Set Root"
Further Reading
That concludes our session on using FamilyTree. The next step is for you to
start entering your own data. To do this, you can start by reading through
example.xml. There is a complete online reference to FTML online
on the Taurus homepage.
Last updated 10th May 2002
Comments support